Wednesday, September 17, 2014

simply black crochet wrap

The Sun rarely appears, the streets wet, my garden plants have their "showers" everynow and then, and I just can't leave the house without my sturdy umbrella on hand. It's  rainy season here in the Philippines! I'm now officially missing the summer heat and my summer hat. But..... there's something about the now-cold weather. It just gave me  the idea to make something that will keep me nice and warm while being curled up in the sofa with my favorite book on hand, or with my playbook looking and admiring crochet masterpieces from all over the world or....  working on another crochet project. With soo many beautiful designs to choose from, (well, thanks world wide web!)  I wanted something easy and simple to make.... And I came up with this design....


A simple file of dc and tr!

Now, let's start....


This yarn I that I will be using is local 3 ply acrylic yarn (locally referred to as Baguio yarn here in our country) together with a 3.5 cochet hook.

Simply Black Crochet Wrap

special abbreviations used:

st - stich
ch - chain
dc - double crochet
sl st - slip stitch
tr - trebble crochet (yarn over 2 times, insert your hook to the indicated stitch, pull up a loop and pull through 2 loops 3  times)


Make a slip knot, then chain multiples of 6 + 4 for (turning point)....again, I advise you guys to use stitch markers for every 50 ch or 100 ch you make to make final counting much easier. This would be the length of your wrap so keep chaining till you have your desired length.

row 1 dc on the 4th ch from the hook (counts as 1 dc)  work dc on every ch till you reach the very first chain. turn your work.

row 2 chain 5 (counts as 1 tr plus 1 ch) skip 1 st, *tr on the next st, ch 1, skip 1 st, tr on the next, ch 1, skip 1 st*  repeat * till end of row. you must end up with a tr. Turn your work

row 3 Chain 3 (counts as 1 dc)  * dc on the ch 1 space, dc on the next*. repeat* till end of row ending up with dc on the 5th chain on the beginning ch 5 and 1 dc on the 4th chain. turn your work.


row 4 reapeat row 2

row 5 repeat row 3

Just keep repeating row 2 and row 3 till you get your desired width. Be sure to end up with row 3 ( the dc row) and for those who are a bit adventurous, you may change colors in every row to create a defferent look. You may also opt to add pretty boarders on both dc sides of your wrap. I left mine as it is.....that's why I''ve called it as Simply Black Wrap.

My! easy, isn't it?  and here's my finish  wrap.... :-) Could be worn in many ways....

around the shoulders


as a scarf...


and this one's my favorite


 Now I wish I had some other belt with a contrasting color  :-)

Friday, August 8, 2014

granny square drawstring wristpurse


My first ever crochet project had been a granny square doily. It was way back in grade school years. Not knowing how to do it properly, I had someone do the beginning part.... a dormmate....more senior than me and did the rest. Well, it came out nice enough for my home economics teacher. Big big thanks to that dormmate.

Looking back now, I've realized that granny square is a good project for beginners since I, who had no idea on crochet that time, managed to do it. And last summer, when this two girls suddenly wanted to learn crochet, I had them make a granny square after helping  them do the basics- slip knot, chain, single crochet, double crochet and treble crochet. And they did great......both now could make beanies, sun hats, scarves, even bags on their own.

I made this pattern for those beginners who are looking for an easy project to work with and also those who are no longer beginners who might just want to make something quick as last minute gifts or giveaways..... I made one while watching a tv show. Wonder how easy this is?

Here.....


GRANNY SQUARE DRAWSTRING WRIST PURSE

Materials used: 3 ply acrylic yarns and 2.5mm crochet hook ( any type may do.....depends on what you like and have in your yarn stash)

crochet abbreviations used:
st - stitch
ch - chain
dc - double crochet
sl st- slip stitch


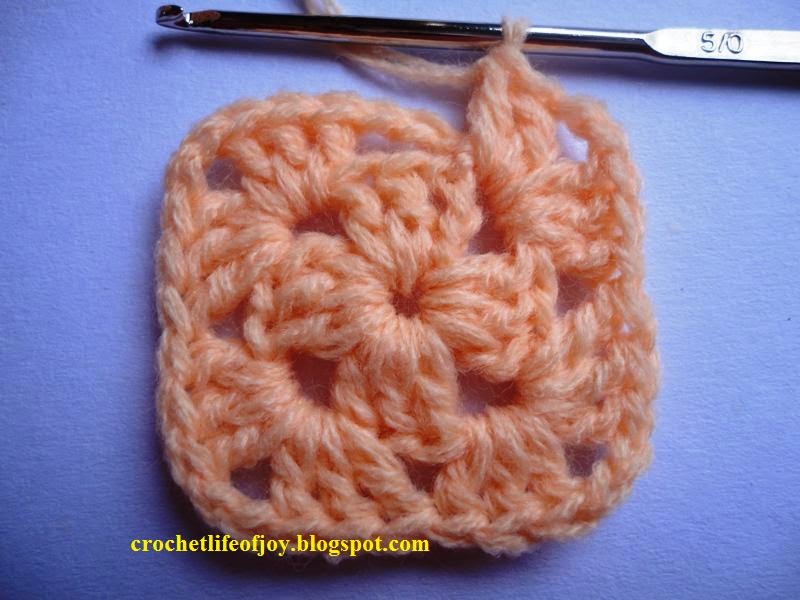
row 1 Into the magic ring, ch 3, work 2 dc. ch 2 *( 3dc, ch 2)*  repeat * two more times. Tighten up and join with a slip stitch on top of  3rd chain of the beginning chain 3


Note: If you're not a magic ring fan, you could do the alternative way. Just ch 4, join with a slip stitch on the 4th ch from the hook to make a ring. ch 3 (counts as 1 dc)work 2 dc then ch 2. (3dc, ch 2) 3 more times then join with a slip stitch on top of the 3rd chain of the beginning chain 3.


row 2 Ch 3, *(3dc, ch 2, 3dc)* into the next ch 2 space, repeat * two more times. on the last ch 2 space, work 3 dc, ch 2, 2 dc then join with a slip stitch on top of the 3rd chain of the beginning chain 3.


row 3 chain 3, 2 dc in the same space as ch 3 (the space in between the 2 sets of 3 dcs of the previous row as shown in the picture)  *( 3dc, ch 2, 3dc on the ch 2 space, 3 dc in the next space)* repeat * 2 more times. work 3 dc, ch 2, 3 dc on the last chain 2 space then join with a slip stitch on thop of the 3rd chain of the beginning ch 3.


row 4 ch 3 (counts as 1 dc), 3dc on the next space, *(3dc, ch 2, 3 dc) in the ch 2 space. 3dc in the next 2 spaces*. repeat * 2 more times. For the last ch 2 space, work 3 dc, ch 2, 3 dc. 2 dc in the next space and sl st on top of 3rd chain of the beginning ch 3.


row 5 ch 3 (counts as 1 dc) work 2 more dc on the same space as chain 3, 3 dc on the next space, *(3 dc, ch 2, 3 dc on the chain 2 space, 3dc on the next 3 spaces)* repeat * 2 more times. On the last chin 2 space, work 3 dc, ch 2, 3 dc. 3 dc into the next space then slip stich on top of the 3rd chain of the beginning chain 3.


row 6 ch 3, 3dc into the next space 2 spaces. *(3dc, ch 2, 3dc into the next chain 2 space. 3dc into the next 4 spaces)*. repeat * 2 more times. for the last chain 2 space, work 3 dc, ch2, 3dc. 3dc on the next space. 2 dc on the last space then join with a sl st on top of  3rd chain of the  beginning chain 3.


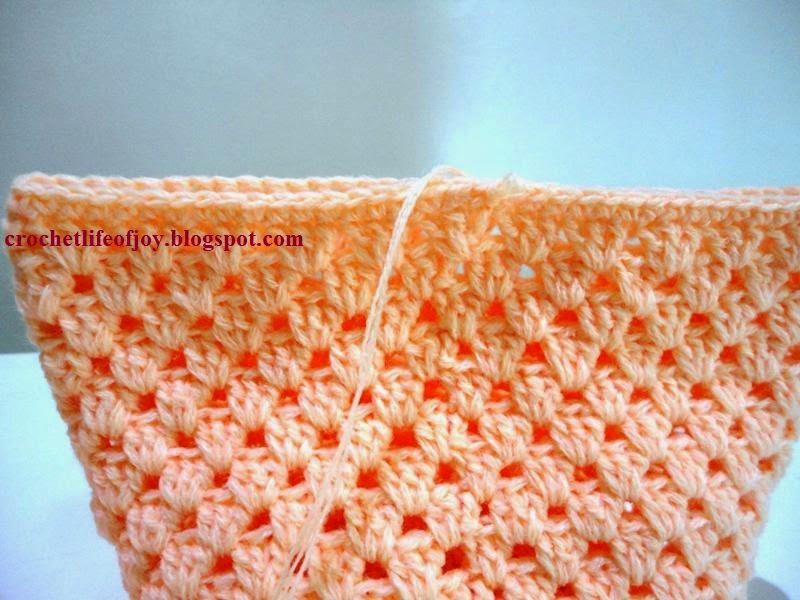
row 7 ch 3 (counts as 1 dc), 2 dc on the same space as chain 3. work 3 dc in every space all through out the row. join with a slip stitch on top of the 3rd chain of the beginning chain 3.


 Note: If you wish to make a bigger version, don't do this row yet. Instead continue to make your square bottom bigger & wider till you reach the size you want.

row 8 ch 3 (counts as 1 dc), 3dc in every space through out this row..pausing on the last space with the beginning chain 3. work 2 dc on that last space then join with a sl st on top of the 3rd row of the beginning chain 3.

row 9 repeat row 7
row 10 repeat row 8


keep repeating row 7 & 8 alternately till you reach row 20.


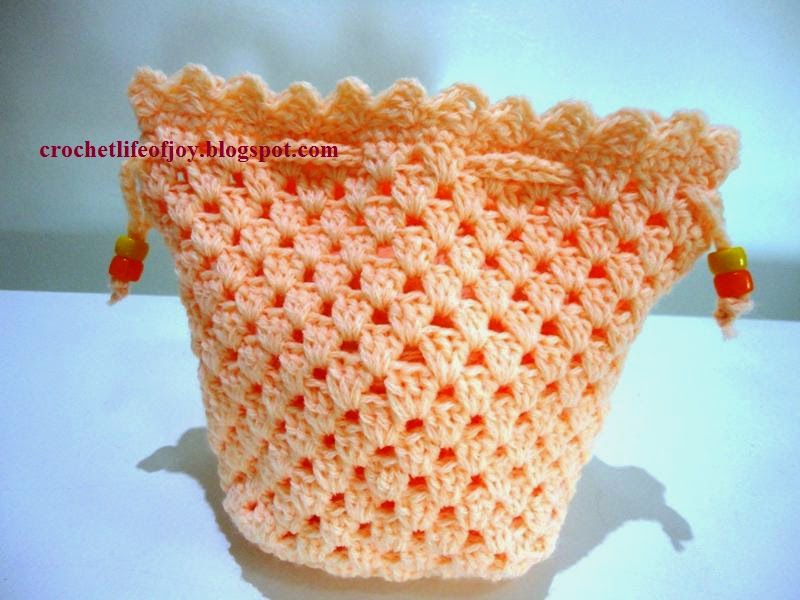
row 21 chain 1, sc in each stitch all way round. join with a sl st on the beginning chain 1- 72 sc all in all.


boarder - chain 3, 2 dc in the same space as chain 3. skip 3 st, *(sc the next. ch 3, 2 dc in the same st as chain 3, skip 3 st, sc in the next) repeat * all throughout the row. join with a sl st on base of the beginning chain 3.


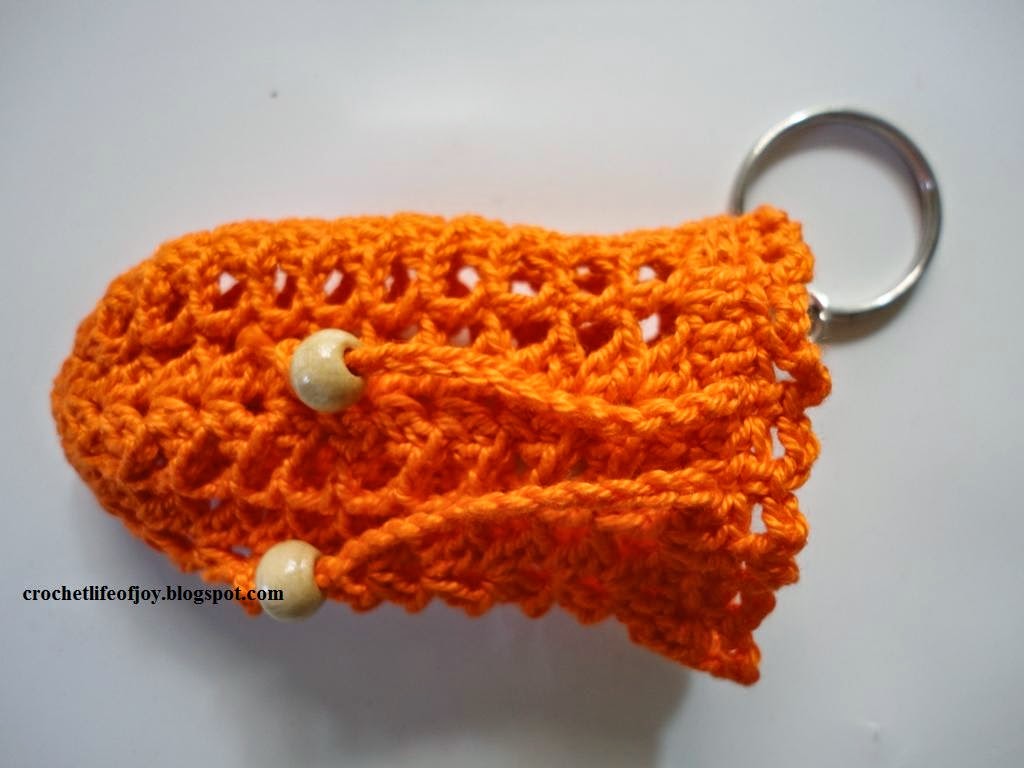
for the string, make a slip knot then chain 100 (or as long as you like) cut the yarn and fasten off. For this project, I made 2 strings. the weave around round 20. as shown in the picture. secore ends of strings by making knots. You may add beads to add more color to your project.


Enjoy your drawstring bag in any way.... something to put your gift into or as a gift itself....or as a party favor....I use mine as a dainty keeper for my gadget chargers,  I've got one inside my purse with my girly essentials in it :-) and another one ready for my cellphone and coin purse whenever I don't feel like having my usual big purse around during brief mall visits. and the one thing I love about making this bag? no need for lining..... :-)


Tuesday, July 15, 2014

crochet mini drawstring bag

once in a while, whenever I'm working on a big project (like scarves or purse) I usually squeeze in some small and quick ones to get a break. Setting aside my current work, I'd pick up some scrap yarn or any yarn that has cought my eye and begin making a flower, a ribbon, or a mini coin purse.......One of my favorite to make is this mini drawstring bag. About two years ago, we've made use of this as a party favor for my nephew's 2nd birthday. We just filled it with local miniature chocolates. It was gone by half, before it could even make it to its display tray! Here's the actual photo of the ones we used as party favor.


You could also make it as mini change purse.
or a place to keep your earphones! Bye bye tangled earphones!


I usually attach a keyring into it and keep a bunch for visiting friends and families.


I always want my drawstring mini bag to be teeny weeny so I usually use mercerized cotton thread  and 1.25 mm steel hook. though you could use any yarn you wish....the bigger the yarn ( and the hook size), the bigger your drawstring bag will be :-)


So here we go!


crochet mini drawstring bag

special terms used:

ch - chain
st - stitch
dc - double crochet
fan - 5 dc on the same st
v stitch - dc, ch2, dc
picot - sc, ch 3, sc on the same st


row 1 make a slip knot, and ch 4 (counts as 1st dc) work 14 dc on the 4th chain from the hook. join with a slip stitch on top of chain 4 at the beginning- (15 dc)


row 2 chain 3 counts as 1 dc. *( skip 2 st, work a fan on the next)* reapeat * 3 more times. skip 2 st, then work 4 dc on the same st as the beginning 3 chain, and join with slip st on top of the beginning 3 chain. after this row, you'll have 5 fans.


row 3 chain 5, dc on the space (of the two fans of the prevous row) this would be your first v st.   *(skip 2 st , work a fan on the next st, skip 2 st, v stitch  on the space between  the two fans of the previous row)* , repeat * 3 more times. skip 2 st, work a fan on the next st, then complete the row with a slip st on top of 3rd chain of the chain 5 at the beginning.


row 4 chain 5, skip 2 st, dc on the next (on top of prevoius row's dc)
*(skip 2 st, work a fan on the next st, skip 2 st, dc on the next, ch 2, skip 2 st, dc on the next)* repeat till end of the row ending with slip st on the 3rd chain of the beginning chain 5. after this row, you'll now have a little "bowl".


rows 5 to 10 repeat row 4


row 11 ch 3 (counts as 1 dc) work 3 dc on the chain 2 space, dc on the next. Continue all the way round working dc on each prevoius row's dc and 3 dc on the chain 2 spaces. join with a slip st on top of the chain 3 at the beginning.


row 12 ch 1, sc on the next st, *(picot on the next st, sc on the next 2 st, skip 2 st, work a fan on the next st, skip 2 st, sc on the next 2 st)* repeat 4 times. join with a slip st on the beginning chain 1.


weave in ends.....

for the string, chain 80 then cut off yarn but leaving around 2 inches tail. to assemble, weave your string around row 11  ( on the dc row). And hey, look here! I've found some colorful plastic beads. Might as well use them to add some colors on our project. 


you could make your own version by changing the boarders....or even changing colors..... you choose... :-)

Saturday, July 5, 2014

easy crochet summer scarf/ beach cover up!


Lately I've been on the look out for scarves and shawls for I wanted to make some. Then I saw this triangular mesh summer scarf on a website. it's airy and summery looking one. The mesh pattern used is very familiar with me. I've used it to make market bags. The designer started at the tip of the triangle. Hmmm... I don't know how to do that but Maybe I could just do it my own way. I'm going to start at the longest part. Inspiration hit me! Our family road trip is getting nearer and I wanted something to show off alongside my crochet summer hat :-) and so I grabbed my cotton yarn and my not-so-expensive-but-trusty hook and corcheted right away.....before I knew, it was finished! I'ts just big enough to wrap around my neck. That would do, I thought.
 These days, another inspiration keeps on playing in my mind whenever I open my closet and catch a glimpse on my mesh summer scarf. Perhaps I could make a larger one that could also be used as beach cover up! I think I still have enough yarn left from making my scarf last summer. and so here it is, let me show you how....
By the way, this kind of project is super easy to make. It would be a great beginner's project. You could use cotton yarn, or worsted weight......let your imagination run! mine's hand- dyed 8 ply cotton. I used  4mm hook


We'll just be using the basic stitches:

Ch - chain
sc - single crochet
tr - trebble crochet

st - stitch

First, make a slip knot, then chain multiples of 5 as long as you wish. if you plan to use it as a cover up, make sure you could wrap it around your waist and that you could make a knot of course. 

TIP: we'd be making a long chain so it would be a great help to use stitch markers. be it a bobby pin or safety pin or even yarn scraps. Just put one stitch marker for every 50 or 100 chain you make to make final counting much easier and if you somehow lost your count in the process, you don't have to go back counting your chains from the start. Just imagine recounting hundreds of  chains... :-D

row 1 sc on the 10th ch from the hook, *ch 5 skip 4 st and sc on the next st.* repeat * across, stop  when you have 5 st remaining on your long chain, chain 2 skip 4 st  then tr on the very first chain. this technique will make it easier to go to the next row  than making several slip stitches to get to the middle of the ch5 space as you crochet you way up. turn your work...


row 2 *ch 5, sc on the next ch5 space*, keep repeating * across...pausing on the last ch5 space, ch 2 then tr on the middle of the last ch5 space. you can see, as we go up, our "mesh" decreases on both sides. again, turn your work.


row 3 repeat row 2 making sure your work decreases on both sides.


keep on working your way up till you reach the "tip" of your triangle, for the last row, just chain 2 and tr on the 5 chain space of the previous row


Once you've finished yout triangle, you may decide if you want to block it by  a single row of sc around your triangle. For added weight, add some pretty boarder, or just leave it as it is! Just cut off the yarn and weave all ends and there you are! another finished project......wrap it around your torso, around your neck.....or...around your waist!


Friday, June 27, 2014

crochet car key cover


Just recently, my husband (finally) acquired his dream car. Then came this dilemma of his. His car key. Why dilemma? Well, he didn’t want any funky and fancy blings to go along with it….especially those made with metals….not even another key!...Those stuffs would just scratch his precious key, he explained. Since he was too busy with training school (goes out pretty early and comes home a bit late and dead tired), he asked me to find him a car key cover made of soft material. Something that wouldn’t do any damage to his car key. Oh boy! Now what? I didn’t feel like going out hunting for his request…and one more thing, I haven’t seen any, yet. Looking at his duplicate key in our bedroom closet, an idea crept to my mind. He mentioned something about soft material right? Well, I’ve got a lot of those…. YARNS! Perhaps I could just make a car key cover for him myself. I spotted a nice shade of blue on my yarn stack. That would do, so let’s start…


Crochet car key cover


Abbreviations used:
St - stitch
Ch – chain
Sl – slip stitch
Sc – single crochet

I'd be using red heart for this project


First Do the magic ring


Row 1 ch 1 then proceed with 1 sc put a stitch marker on the top of thesc at the beginning , 9 sc around the ring , do not join– 10 st including chain. Just make sure there’s a hole in the middle enough for the pull through “string”. We’re gonna make that later.


Row 2 , remove the stitch marker, 1 sc on “that” stitch st, put back the stitch marker on top of the first sc, 1 sc on the same st, 2 sc in each st around. Again do not join- 20 st


Row 3 remove stitch marker, 1 sc on that st where the marker had been,put back the marker, 1 sc in each st around- 20 st


Row 4 continue working your way around till you get the size you wish. Moving the stitch marker as you go. Mine’s 10 rows.


Finishing: remove stitch marker, sl st into the stitch where your marker had been. Cut off the yarn and weave in ends.
For the pull through string, ch 35 (or longer if you wish) insert the tail of the chain into the keyhole. Then join ends with a sl st on the first chain. Another option, you may do a single round of sc. For my project, I prefer to have just the chains. A round of sc would make it hard to pull through the top hole of the cover. You have to make sure it “fits”…then, cut the yarn…weave in ends…..


To assemble, insert your hook on the cover’s hole and pull up the string of chains. At this point you will be needing some sort of stopper or your key would slip. A puff flower? Oh, A cute bow perhaps….or yarn pompons….hmmmm….let’s give pompons a try…I haven’t done that yet….


Whew! All done!