Friday, June 27, 2014

crochet car key cover


Just recently, my husband (finally) acquired his dream car. Then came this dilemma of his. His car key. Why dilemma? Well, he didn’t want any funky and fancy blings to go along with it….especially those made with metals….not even another key!...Those stuffs would just scratch his precious key, he explained. Since he was too busy with training school (goes out pretty early and comes home a bit late and dead tired), he asked me to find him a car key cover made of soft material. Something that wouldn’t do any damage to his car key. Oh boy! Now what? I didn’t feel like going out hunting for his request…and one more thing, I haven’t seen any, yet. Looking at his duplicate key in our bedroom closet, an idea crept to my mind. He mentioned something about soft material right? Well, I’ve got a lot of those…. YARNS! Perhaps I could just make a car key cover for him myself. I spotted a nice shade of blue on my yarn stack. That would do, so let’s start…


Crochet car key cover


Abbreviations used:
St - stitch
Ch – chain
Sl – slip stitch
Sc – single crochet

I'd be using red heart for this project


First Do the magic ring


Row 1 ch 1 then proceed with 1 sc put a stitch marker on the top of thesc at the beginning , 9 sc around the ring , do not join– 10 st including chain. Just make sure there’s a hole in the middle enough for the pull through “string”. We’re gonna make that later.


Row 2 , remove the stitch marker, 1 sc on “that” stitch st, put back the stitch marker on top of the first sc, 1 sc on the same st, 2 sc in each st around. Again do not join- 20 st


Row 3 remove stitch marker, 1 sc on that st where the marker had been,put back the marker, 1 sc in each st around- 20 st


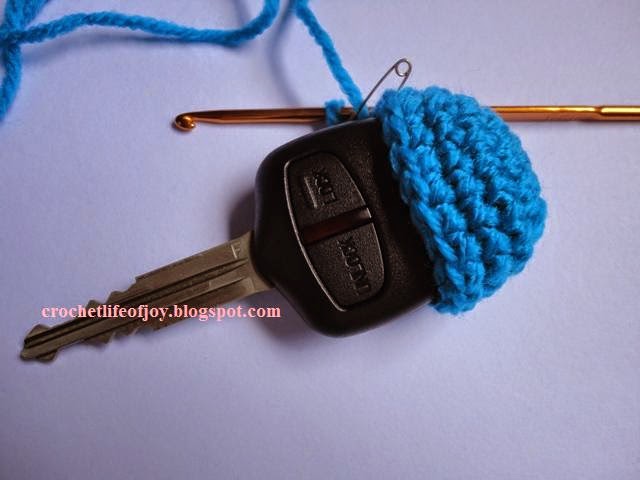
Row 4 continue working your way around till you get the size you wish. Moving the stitch marker as you go. Mine’s 10 rows.


Finishing: remove stitch marker, sl st into the stitch where your marker had been. Cut off the yarn and weave in ends.
For the pull through string, ch 35 (or longer if you wish) insert the tail of the chain into the keyhole. Then join ends with a sl st on the first chain. Another option, you may do a single round of sc. For my project, I prefer to have just the chains. A round of sc would make it hard to pull through the top hole of the cover. You have to make sure it “fits”…then, cut the yarn…weave in ends…..


To assemble, insert your hook on the cover’s hole and pull up the string of chains. At this point you will be needing some sort of stopper or your key would slip. A puff flower? Oh, A cute bow perhaps….or yarn pompons….hmmmm….let’s give pompons a try…I haven’t done that yet….


Whew! All done!


Sunday, June 22, 2014

Myra's crocheted summer sling bag

ahemm...! All girls love bags...bags of all sorts and kinds and colors and brands, don't we? 'course we do :-) Now, here's Myra.... a working college student all the way from Mindoro (MIN'DORO), Philippines. She works during the day and study by night. She'd seen how I enjoy crocheting....and wanted to give it a hand also. Since I've been very busy doing my crochet stuff, I simply told her to watch youtube videos for beginners because that's what I did before.... The friend who inspired me into crocheting is currently residing on the other side of the globe. Having no one to teach me even the basics, I turned on the world wide web so to speak :-)...Glad I did just that and now, I'm always looking forward for my "me" time....where in I could just sit in any comfortable spot in my house with my hook and my yarn.

Oh, let's get back to Myra...she never did get any lesson from the videos I recommended to her. She said she didn't understood a thing since the videos were all in slang english language. I didn't encouraged her anymore....I thought she isn't really into it or not just interested. Then come summer break, As usual I'm with my hook and my yarn on our kitchen high chair. Suddenly she said she wanted to learn how to crochet. So I handed her a ball of yarn and a hook. Tought her the basics Slip knot, chain, single crochet, double crochet, trebble crochet back to to single crochet then double......after a while her practice piece became longer...she became excited after finally getting it right...and frustrated if she did some mistakes and her work doesn't look nice at all. Her first crochet project was a small square bottomed drawstring pouch. then a simple scarf. She was soo delighted! Then she told me she wanted to make a bag....a sling bag she could take to school. I said okey. But First I made her search through the internet for easy designs...and she found this free crochet pattern summer sling bag. You could find the pattern tutorial here...

She used two colors of light worsted yarn in baby pink and maroon red...size 3.5 mm hook. The pattern itself was easy to follow...I just did the magic ring (although the patterns says chain then join into a circle)and first row for her then she did the rest. she had finished both sides of the bags and the handle....hope she could still endure the final step. she had to assemble them to make it into a sling bag.... and she did!


Tuesday, June 17, 2014

lacy round stitch

Wow! I'm supposed write something that's easy and simple project to make for my first ever post but I'm still on my cloud 9 after "breaking the math" of this stitch. and a good friend of mine , owner of www.lynscrafts.com asked me to share the pattern and so to abide by her special request, I'm now sharing you this awesome pattern. Use it to make pretty scarf, shawls, or even beach cover up (I'm currently making a shawl with this stitch.....)

I saw a chart of this online, downloaded it (it's free), grabbed my yarn immediately and tried my best to crochet it but..... I didn't like it....it doesn't look pretty at all! I tried to do it over and over again with the same results.Grumbling under my breath, I put my yarn aside. The crochet chart stayed on my playbook for ages......I was so disappointed with it.

I kept posting my crochet projects on my personal facebook account  . Just then a dear cousin who's working overseas said her co workers are interested on my scarves...asked me to make different designs. I said ok I will.....and so I browsed on my available patterns that's when I came across this stitch again.

I gave it a try, on the fifth row I gave up like the first time.. I thought to myself that I would never ever figure it out...I was supposed to unwind the whole thing...It was laid on the sofa beside me....I could see I got the "round " part....it was the foundation chain and sc row that ruined it. I kept marveling on the round stitch then the idea hit me, perhaps I could just count the bottom chains that makes the round stitch! Why in crochet's name didn't I  thought of that! I made a run for another ball of yarn and started the foundation chain, continued with the next round then the next....behold! my perfect lacy round stitch! now let's start with our project!!

I initially thought of making a chart but I'm not a good artist :-) I don't want you guys to break your neck trying to figure out what I mean with my clumsy drawing


for my shawl I used hand dyed 4 ply cotton in variegated color and 3mm hook.

abbreviations used:
ch - chain
dc - double crochet
st - stitch
dtr - double treble

CROCHET LACY ROUND   STITCH

Chain multiples of 9  (length depends on the project you want to make ) plus 6 extra chain.

Round 1  dc on the 7th chain from the hook, ch 2 , skip 2 st, dc on the next st, skip 2 st ,dc on the next st, ch 2, skip 2 st, (dc, ch 2, dc) on the next...continue this pattern till the end of the row. NOTE: be sure to end up with a v stitch (dc, ch2, dc on the same st) if not, you’ll end up with a half circle.


Round 2 ch 1 and turn. Ch 4 skip 2 st and dc on the next st (on top of the dc of the previous round!) ch 5 skip 6 st, dc on the next st, chain 2, skip 2 st and dc on the next st, ch 5, skip 6 st, dc on the next st, chain 2, skip 2 st and dc on the next. Repeat till the end of the row.


Round 3 ch 1 and turn, ch 2, skip 2 st, dc on the next st, ch 2 skip 2 st and (dc, ch 2, dc) on the next st (this v st must be located at the middle part of the 5 chain space) ch2, skip 2, dc on the next st, skip 2 st, and dc on the next. Ch2 skip 2 st, (dc ch 2 dc) on the next st. Ch 2 skip 2 st, dc on the next st, skip 2 st, and dc on the next....repeat till the end of the row. You must already be seeing your completed lacy round stitch by this time... as shown below


Round 4 if you want your project to go up straight, you’ll be working on half circles on both side for this row. Ch 1 and turn, chain 6 skip 3 st and dc on the next ( basically the first dc of the V st of the previous round) ch 2 skip 2 st and dc on the next. Ch 5, skip 6 st and dc on the next st. Ch2 skip 2 st then dc on the next. Repeat till end of last v stitch of the previous row. Then lastly, ch2 , and dtr (yarn over 3 times, insert your hook on top of the inverted V st of the previous row, then yarn over and pull through every 2 loops 3 times, yarn over and pull through 2 loops.)


Round 5 ch 1 and turn, (ch4 and dc ) on the same st, ch 2 skip 2 st, dc on the next st, skip 2 st dc in the next st, ch 2 skip 2 st (dc ch2 dc ) on the next st. Ch 2 skip 2 st, dc on the next st, ch 2 skip 2 st then dc on the next st. Skip 2 st then dc on the next st...repeat till end of row. NOTE: again you should be ending with a V stitch in this row to begin another round stitch.


Round 6 repeat round 2


Round 7 repeat round 3


Round 8 repeat round 4
round 9 repeat round 5

keep repeating rounds 2, 3,4, and 5 till you get the length you wish.... then block as needed...put some pretty edging if you want to.....then show off to everybody! crochet crochet!!!