
You could also make it as mini change purse.
or a place to keep your earphones! Bye bye tangled earphones!

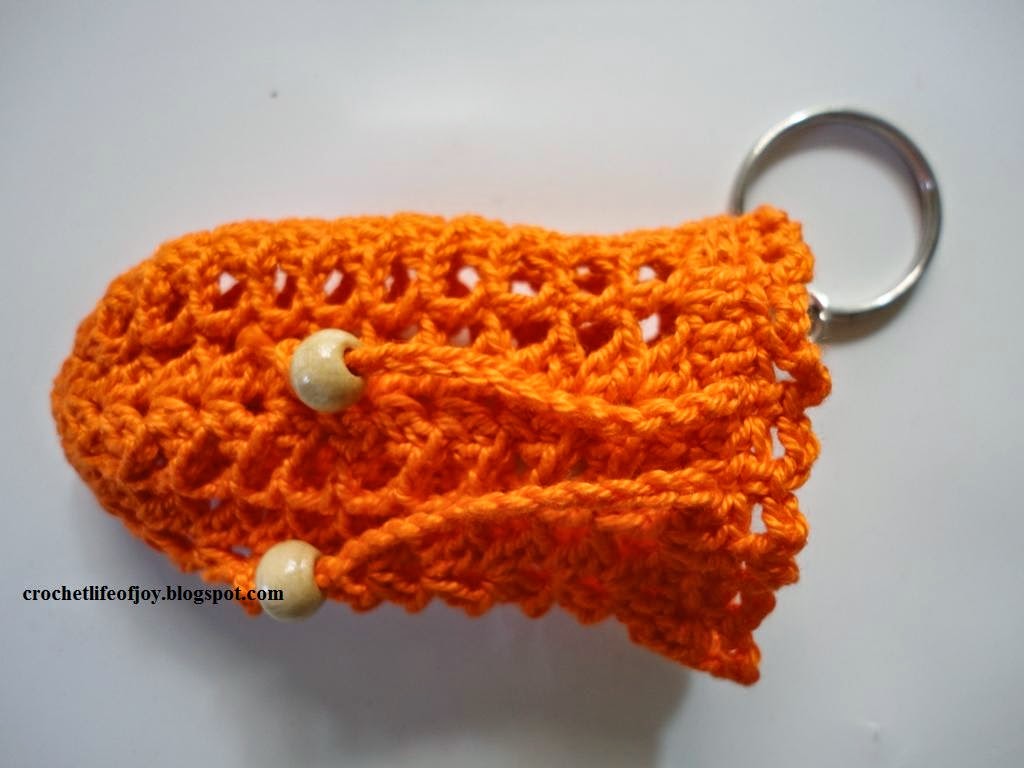
I usually attach a keyring into it and keep a bunch for visiting friends and families.
I always want my drawstring mini bag to be teeny weeny so I usually use mercerized cotton thread and 1.25 mm steel hook. though you could use any yarn you wish....the bigger the yarn ( and the hook size), the bigger your drawstring bag will be :-)

So here we go!
crochet mini drawstring bag
special terms used:
ch - chain
st - stitch
dc - double crochet
fan - 5 dc on the same st
v stitch - dc, ch2, dc
picot - sc, ch 3, sc on the same st
picot - sc, ch 3, sc on the same st
row 1 make a slip knot, and ch 4 (counts as 1st dc) work 14 dc on the 4th chain from the hook. join with a slip stitch on top of chain 4 at the beginning- (15 dc)

row 2 chain 3 counts as 1 dc. *( skip 2 st, work a fan on the next)* reapeat * 3 more times. skip 2 st, then work 4 dc on the same st as the beginning 3 chain, and join with slip st on top of the beginning 3 chain. after this row, you'll have 5 fans.

row 3 chain 5, dc on the space (of the two fans of the prevous row) this would be your first v st. *(skip 2 st , work a fan on the next st, skip 2 st, v stitch on the space between the two fans of the previous row)* , repeat * 3 more times. skip 2 st, work a fan on the next st, then complete the row with a slip st on top of 3rd chain of the chain 5 at the beginning.

row 4 chain 5, skip 2 st, dc on the next (on top of prevoius row's dc)
*(skip 2 st, work a fan on the next st, skip 2 st, dc on the next, ch 2, skip 2 st, dc on the next)* repeat till end of the row ending with slip st on the 3rd chain of the beginning chain 5. after this row, you'll now have a little "bowl".


rows 5 to 10 repeat row 4

row 11 ch 3 (counts as 1 dc) work 3 dc on the chain 2 space, dc on the next. Continue all the way round working dc on each prevoius row's dc and 3 dc on the chain 2 spaces. join with a slip st on top of the chain 3 at the beginning.

row 12 ch 1, sc on the next st, *(picot on the next st, sc on the next 2 st, skip 2 st, work a fan on the next st, skip 2 st, sc on the next 2 st)* repeat 4 times. join with a slip st on the beginning chain 1.


weave in ends.....
for the string, chain 80 then cut off yarn but leaving around 2 inches tail. to assemble, weave your string around row 11 ( on the dc row). And hey, look here! I've found some colorful plastic beads. Might as well use them to add some colors on our project.
row 4 chain 5, skip 2 st, dc on the next (on top of prevoius row's dc)
*(skip 2 st, work a fan on the next st, skip 2 st, dc on the next, ch 2, skip 2 st, dc on the next)* repeat till end of the row ending with slip st on the 3rd chain of the beginning chain 5. after this row, you'll now have a little "bowl".
rows 5 to 10 repeat row 4
row 11 ch 3 (counts as 1 dc) work 3 dc on the chain 2 space, dc on the next. Continue all the way round working dc on each prevoius row's dc and 3 dc on the chain 2 spaces. join with a slip st on top of the chain 3 at the beginning.
row 12 ch 1, sc on the next st, *(picot on the next st, sc on the next 2 st, skip 2 st, work a fan on the next st, skip 2 st, sc on the next 2 st)* repeat 4 times. join with a slip st on the beginning chain 1.
weave in ends.....
for the string, chain 80 then cut off yarn but leaving around 2 inches tail. to assemble, weave your string around row 11 ( on the dc row). And hey, look here! I've found some colorful plastic beads. Might as well use them to add some colors on our project.


you could make your own version by changing the boarders....or even changing colors..... you choose... :-)


